

How to Audit Your Website for Privacy Compliance
A Step-by-Step Guide for Marketers and Founders


Why Every Business Should Run a Privacy Audit
If your website uses analytics, pixels, chat widgets, or any advertising tags, you may be collecting information that falls under California’s privacy laws (CIPA § 638.51).
Many companies across the United States have received privacy notices from California. These typically target websites that track IP addresses, device IDs, or cookies from LinkedIn/Facebook before users grant permission.
A basic audit helps you:
Discover hidden tracking scripts
Confirm that your cookie banner actually blocks those scripts
Fix simple issues before they turn into legal problems
You can do this yourself in less than an hour.
Step 1. Inventory Every Tag and Script
Goal: Know what is running on your site.
Tools:
Browser Developer Tools (Right-click → Inspect → Network → Reload)
BuiltWith, Wappalyzer, or Ghostery
Look for domains such as:
linkedin.com
facebook.com
google-analytics.com
googletagmanager.com
tiktok.com
hubspot.com
hotjar.com
Record each one with its purpose and whether it loads before consent. Example:
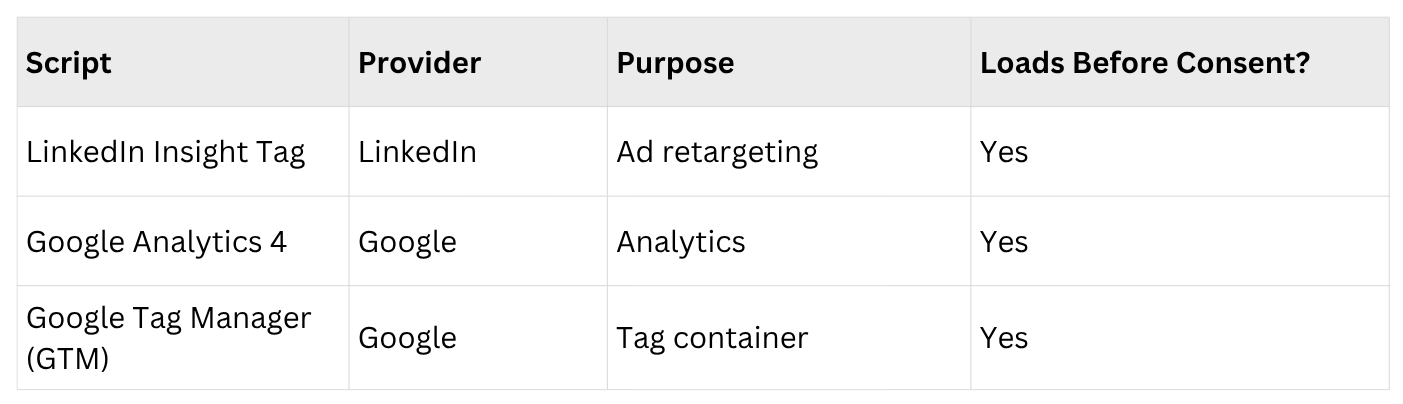
If you see googletagmanager.com, it means Google Tag Manager is active. GTM can load other scripts automatically, so you will need to check what it is firing and when.
Step 2. Test Your Consent Banner
Goal: Confirm that it actually controls the trackers.
Open your site in an incognito window.
Load the homepage without clicking “Accept.”
Open Inspect → Network and watch for calls to third-party domains.
If you see requests to LinkedIn, Facebook, Google Analytics, or Google Tag Manager (GTM) before you give consent, the banner is only informational, not functional.
Good banners should:
Block all non-essential scripts until consent
Offer clear “Accept” and “Reject” buttons
Display differently for visitors in California and the EU
Recommended consent-management tools: CookieYes, Cookiebot, OneTrust
Step 3. Check What Data You Are Sending
Goal: Make sure no personal identifiers are sent automatically.
Common signals that create legal risk
IP addresses
Device or browser fingerprints
Unique IDs linked to users
If your analytics or GTM setup collects these by default, consider:
Using server-side tagging so vendors do not see user device details (Google Developers Guide)
Temporarily blocking California traffic until consent is enabled
Step 4. Verify Compliance Across All Pages
Tags can appear in many places, not just your homepage.
Check:
Landing pages hosted on HubSpot, Unbounce, or Mailchimp
Embedded videos from YouTube or Vimeo
Chatbots like Drift or Intercom
Appointment schedulers such as Calendly
All triggers and tags inside GTM (open your Google Tag Manager container and review what loads “on page view”)
Make sure your consent tool also covers these embeds and GTM triggers.
Step 5. Document Everything
Good documentation protects you if questions arise.
Keep:
A tag inventory spreadsheet
A short note showing when tags load and what triggers them
Screenshots of your banner on desktop and mobile
Logs showing user consent records
This is often enough to prove responsible compliance if challenged.
Step 6. Fix What You Find

Step 7. Make Privacy Routine
Run a tag audit every quarter
Review your cookie policy once a year
Train your marketing and development teams to check consent before adding new GTM tags or third-party tools
The Takeaway
A privacy audit is about staying in control, not about fear.
By knowing what runs on your website and gating it behind consent, you can:
Comply with California and global privacy rules
Avoid unnecessary legal exposure
Keep using data safely to grow your business
Run the audit once, repeat it every few months, and you will already be ahead of most companies online.